Any regular reader to this blog will certainly have got the message by now that I love food and cooking and a favourite bake in my house are cookies. Cookies are comforting, cookies are yummy and cookies make perfect wedding favours. You don't have to be an expert at icing to pull off a great chunky cookie and even more delicate biccies don't need to be complicated. Make a big batch of dough and you can make all you need relatively quickly - perfect.
So in this post, as well as some visual inspiration, I'm going to share a couple of my favourite and fool proof cookie recipes - one classic choc chunk and one vanilla. I do suggest you bake both to decide what you'd like as favours and have a proper 'taste test' session (best done whilst sitting in the sun with a cup of tea and a wedding magazine I think).

Above - here, the cookies are tucked away in brown paper bags. The tops are rolled down and the large tags help seal and bring a splash of colour. Bags this size would be much too large to put on tables at dinner as they would completely overwhelm the other details so I would suggest these should be set out on a favour table or kept as leaving presents for guests instead (so they can nibble in their room or on the car journey home!) Image - Betsy White

Above - Cookies served with a glass of milk look great. Or, for the adults, how about siting them alongside some yummy boozy hot chocolate? Image - Jen Williams
Ok, here's my 'go to' chocolate chunk cookie recipe - I recently made batches of these for my son to take into school on his birthday and they went down a storm in the classroom (and in the staffroom too!). Sometimes I replace the chocolate chunks with fudge chunks, chocolate buttons, chocolate covered raisins or peanuts and I've also made them with chocolate covered honeycomb bites which were totally yum. If you make the cookies smaller than the suggested dollop size below, you can get around 40 mouth sized morsels of goodness and any leftover dough will keep in the fridge in a sealed container for a couple of days (increase the cooking time to around 20 mins if using straight from the fridge!). You can also freeze the cooked cookies for up to three months and then just defrost them for around 3-4 hours at room temperature. So here goes...
You'll need - 150g unsalted butter, 125g soft light brown sugar (if you don't have this, don't fret, I've used mixes of sugars depending on what I have hanging around but soft light brown is the creme de la creme of sugars for this recipe), 100g caster sugar, 2 tsp vanilla extract, 1 egg, 1 egg yolk, 300g plain flour, half tsp bicarbonate of soda, 300g chocolate chunks or whatever you care to use. You'll need a large baking sheet too and I slip a sheet of baking parchment on mine.
What you need to do - pre-heat you own to 170 degrees Celsius and then melt the butter on the hob in a large pan. Take it off the heat when melted and let it cool a little bit before you add in the brown sugar and caster sugar and stir until everything is nicely mixed together. Add the vanilla, egg and egg yolk then beat until you think your arm is going to fall off/everything is well mixed. Gently mix in the flour and bicarbonate of soda then fling in the chocolate chunks and mix again. Using a quarter cup measure, a serving spoon or ice cream scoop, spoon out the mixture in approx. 60ml portions and dollop the blobs onto the baking sheet (leave room because they expand!). Fling in the oven for around 15 mins until the cookie tops are going golden and cool for a few mins after taking them out of the oven before you put them onto wire racks. You'll probably need to cook a few batches to use up all the dough.

Above - this cookie bar is gorgeous. A selection of cookies in pretty glasses along with bags to pop them in and circular stickers to seal the bag. Of course, you could skip the bags and set up the cookie bar next to a tea and coffee station and then guests can help themselves and pop the cookie on their saucer. That would be a sweet midnight treat! Image - Martha Stewart
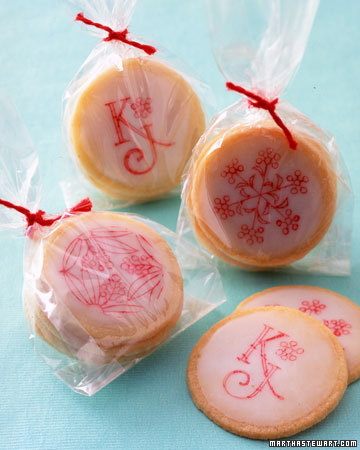
Above - I know I said you didn't need to do fancy icing to make your own cookie favours and I stand by that but I wanted to include this gorgeous cookies too. You could use edible pens to 'ink' designs onto edible paper if you're so inclined but when I make the vanilla cookie recipe below, I melt some milk chocolate and either dunk half of the cookie into it or drizzle zig-zags of chocolate across the batch. Easy! Image - Martha Stewart
So this is my favourite vanilla cookie (well, I guess it's strictly a biscuit, please forgive me!). What I love about this is its versatility. Once you've rolled out the dough, you can cut the cookies into any shape you can find cookie cutters for. I've made flowers, stars, simple rounds, letters and for my son's last birthday party, ghosts and bats! If you want to ice them, roll out some ready-to-roll icing in your colour, cut out the shape using your cookie cutter and, using some melted apricot jam as glue, stick the icing to the cookie (and decorate further if you wish!). But, on with the recipe...
You'll need... 200g soft unsalted butter, 200g caster sugar, 2tsp vanilla extract, 1 egg (beaten), 400g plain flour.
What you need to do... Put the sugar and butter in a bowl with the vanilla extract and beat furiously until it's oh-so light and creamy. Slowly add the beaten egg, beating more after each little addition then sift in the flour and mix in. Get your hand into the bowl to bring everything together and make a soft dough. Split your ball of dough in half and wrap each chunk in cling film and then pop it in the fridge until it's nice and firm which will take around 30 mins. Then, lightly flour your worktop and roll out the dough. You need it to be around 5mm thick. Cut out the shapes you want and then arrange on baking sheets lined with baking parchment. The trays with the cut out cookies need to go back in the fridge for another 15 mins which gives you time to pre-heat the oven to 180 Celsius. Bake your cookies for 10-12 mins (smaller ones need less time) and turn the trays half way through cooking so everything browns evenly. Remove from the oven, allow to cool for a few mins then continue cooling on a wire rack. Once they're cool, decorate as you wish.

Above - I just love this idea. The little bite size cookies in the pretty little jar with the ribbon and tag would make such a perfect favour. They could be bought out with the teas and coffees post-meal and given to each guest as a gift then or set out for them to take as they leave. Image - Martha Stewart

Above - I just love this packaging idea because it's using the usual in an unusual way. Those little bags are paper CD covers! And the label has just been printed from a clip art template available on Martha Stewart's website. Brilliantly innovative. Image - Martha Stewart

Above - a great alternative if you don't want to make cookies for the day! These jars all contain cookie ingredients and a label on the back tells you how to turn them into baked bits of heaven. Love the fabric tops and string ties and those personalised labels look great. I also think the higgledy-piggledy way the jars are in this wooden trug looks better than lines and lines of precisely arranged containers - perfect for a laid back wedding. Image - My Cool Wedding


No comments:
Post a Comment